Great terraces make steep land feel easy. They turn awkward yards into calm, useful rooms outdoors. However, strong terraces do not happen by chance. They come from simple planning, innovative materials, and careful steps. Therefore, you begin with the ground under your feet. You check soil, slope, drainage, and sun. Also, look at local rules and safe heights for walls. In the middle of this planning, what materials and techniques are used to build terraces often becomes the key question that shapes every choice. Because wood, stone, and concrete act differently, your site matters greatly. For example, clay holds water, so drains matter more.
Meanwhile, sandy soil drains fast, so edges must lock in place. Moreover, frost, roots, and foot traffic all affect the base. So you design layers that stay dry and strong. Finally, you create a build plan you can follow step by step. With these basics, your terrace will feel solid, safe, and beautiful for years. As you get started, you’ll find helpful field notes and guidance on Construct N Build, where builders and homeowners trade clear ideas you can use immediately.
What Are The Terrace Types
| Type | Best For | Pros | Watch Outs |
| Timber deck | Light soils, quick builds | Warm look, easy to cut | Needs sealing and checks |
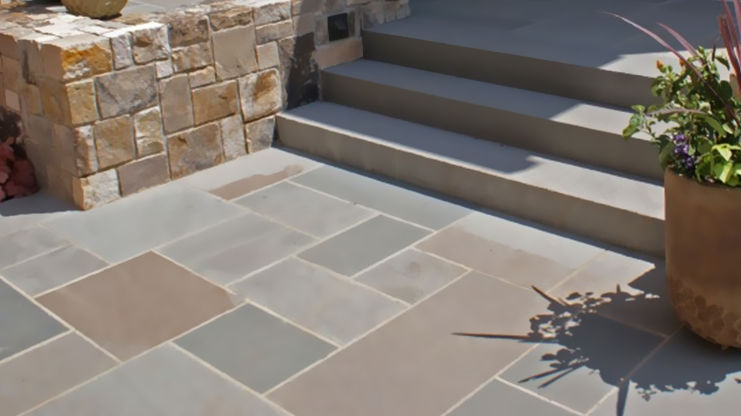
| Stone patio | Long life, classic style | Durable, cool underfoot | Heavy, higher cost for some stones |
| Concrete slab | Modern lines, high use | Strong, low upkeep | Can crack without joints and base |
| WPC deck | Easy care, damp spots | Resists rot and pests | Can feel hot in the sun |
| Brick pavers | DIY repairs, patterns | Replace single units | Needs solid edge restraint |
| Gravel terrace | Budget and drainage | Fast, permeable | Loose surface, raking needed |
Terraces come in a few common forms, and each one suits different needs. Therefore, match the type to your soil, budget, and style. Also, think about care, heat, and grip when wet. The quick guide below helps you compare options before you choose.
However, a chart is only a start. You still need to test a sample where you live. Next, walk on the surface when it is wet and sunny. Because small trials save money later, you should always test before you buy.
Ideas For A Sloping Terrace Garden
Slopes can waste space, but terraces turn them into zones for life. First, break the hill into short steps with low retaining walls. Also, keep each rise modest to limit pressure and make access easy. Then, place steps where people already move, because paths that match habits get used.
During the design process, what materials and techniques are used to build terraces help determine wall thickness, base depth, and drainage details for safety. Moreover, you should add a perforated drain behind each wall. Therefore, water will not push on the structure during storms.
Additionally, geotextile fabric is used to separate soil and gravel. So the base stays clean and firm. Plant deep roots above and below the walls to hold soil and soften edges. Finally, add low lights for safe nights. Because light defines edges, steps feel secure and inviting after dark.
“Build in layers, and gravity becomes your helper.”
Wood, Stone, WPC, Or Concrete: What Material Do You Use?
Material choice shapes cost, comfort, and care from day one. Therefore, match your pick to the climate, sun, and how you will use the space. Wood feels warm under bare feet, installing fast with simple tools. However, it needs sealing and regular checks. Stone looks natural, stays cool, and can last for decades. Yet it is heavy and may cost more to move and cut.
Concrete handles high traffic and offers clean lines. Still, it needs joints, a stable base, and good drainage. WPC resists rot and insects, and it cleans with soap and water. Also, it keeps a steady look over time. In many yards, your shortlist will narrow as you test samples and budgets, because what materials and techniques are used to build terraces depends on climate, soil, and the upkeep you accept.
Quick checks before you commit:
- Test grip when wet and dusty.
- Check the heat under full sun at noon.
- Confirm local frost depth for the base.
- Review maintenance steps for each season.
Finally, choose what fits your life today and five years from now.
The Most Crucial Step: Planning The Terrace
Good planning makes building easier and safer. Measure the slope, note soil type, and map water paths. Then, check local codes for wall height, handrails, and setbacks. Because hidden water causes many failures, you should plan drains from day one. In the middle of this review, materials and techniques are used to build terraces, helping you pick base layers, wall depth, and surface finishes. Also, draw a simple plan with levels, steps, and runoff arrows. Moreover, mark utilities before you dig. Finally, list tools, helpers, and delivery access so that workflows flow well.
Planning checklist:
- Measure runs, rises, and total drop.
- Test the soil with a jar or probe.
- Set a drainage path and outlet.
- Confirm frost depth for footings.
- Sketch materials, edges, and step locations.
“Plan the water; the water will not plan your repair.”
How Much Time Should You Plan To Lay Out The Terrace?
Time depends on size, soil, and weather. However, you can use a basic range to plan labor and rentals. For a mid-size patio, most DIY teams need one to two weekends. Because delays happen, you should add a buffer day for rain and deliveries. During your estimate, what materials and techniques are used to build terraces? They often shift the schedule since stone cutting and drainage layers add hours. Also, set milestones so you see steady progress.
| Phase | Typical DIY Time | Notes |
| Layout & marking | 2–4 hours | Strings, levels, and stakes |
| Excavation | 6–10 hours | More in clay or roots |
| Base & compaction | 4–8 hours | Multiple thin lifts |
| Edging & setting bed | 3–5 hours | Check elevations |
| Surface install | 6–12 hours | Cuts slow the pace |
| Jointing & cleanup | 2–3 hours | Brush, compact, mist |
Time savers:
- Stage materials close to the work.
- Cut pieces in batches.
- Compact in thin layers, not one deep lift.
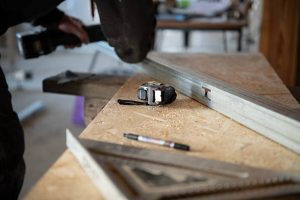
What Materials And Techniques Are Used To Build Terraces?
Start with a careful layout. Set string lines at finished height, then subtract surface and bedding thickness. Next, excavate to base depth and add a slight slope away from the house. Because strong bases last, you should place crushed stone in thin lifts and compact each pass. What materials and techniques are used to build terraces? Then, set the edging to lock the field. After that, install pavers, boards, or slabs, keeping joints even. Finally, sweep in jointing sand or make control joints for concrete, and rinse gently.
Build sequence (quick cues):
- Layout: Strings are tight; check for square.
- Dig: depth equals base plus surface.
- Separate: geotextile under stone if the soil is soft.
- Base: compact 2–3 inch lifts until firm.
- Bed: screed a thin, level layer.
- Set: place units; keep gaps consistent.
- Lock: edge restraints or perimeter beam.
- Finish: joint, compact again, and clean.
Safety notes:
- Wear eye, ear, and dust protection.
- Lift with legs, not your back.
- Keep a clean site to avoid trips.
Practical Tips For Building A Terrace On A Slope
Slopes add pressure, so keep wall heights modest and step them up the hill. Also, bury each wall’s base at least one-tenth of its height. Because water builds pressure, you should place a perforated pipe and clean gravel behind each wall. Wrap gravel with fabric to prevent fines from clogging voids.
Understanding what materials and techniques are used to build terraces helps you choose block strength, deadmen ties for timber, and weep details during layout planning. Moreover, the stairs should be aligned with natural walking lines, and the treads should be sized for comfort. Finally, plant deep-rooted groundcovers to stabilize soil and cool hard surfaces.
Slope-smart pointers:
- Step the footing at each level change.
- Stagger joints like a brick wall.
- Break long runs with control joints.
- Add a surface swale above the top wall.
- Light each landing for safe nights.
“Small, well-drained steps beat one tall, soggy wall.”
| Element | Better Choice | Why |
| Wall core | Clean ¾″ gravel | Drains and locks |
| Backfill fabric | Non-woven geotextile | Filters fines |
| Surface | Textured paver or broomed concrete | Safer when wet |
| Anchors | Timber deadmen or geogrid | Adds pull-out resistance |
FAQs
- What materials are best for building a terrace on a slope?
Stone, concrete, or brick pavers work best, handling weight and water pressure well.
- What is the cheapest terrace material?
Gravel terraces cost less upfront, though they need raking and edge restraints.
- Can I build a terrace myself without a contractor?
Many terraces are DIY-friendly if you plan soil, slope, and drainage carefully.
- How long does it take to build a terrace?
A medium patio may take one to two weekends for a small DIY team.
Make Your Terrace Pretty
Beauty works best when it supports function. Therefore, start by keeping surfaces clean, dry, and safe. Also, repeat materials in small ways so the space feels calm. However, avoid clutter that blocks walking paths. Because comfort matters, plan shade, seating, and soft light before small décor. Style choices feel easier when you pair them with practical checks. For example, select slip-resistant textures where rain collects. Choose fabrics that resist sun fading and brief rain showers for lasting outdoor appeal. At the heart of these design choices, understanding what materials and techniques are used to build terraces ensures you balance style with durability. Test a sample board or paver next to your home’s siding at noon and dusk to avoid unexpected contrasts. Finally, from soil prep to finishing touches, Construct N Build shares insights that work in real life.